Chapter 5 of 12
Read this chapter as text
All 17 steps of this chapter, written out on one page. The activities and most pictures aren’t included: to see them, open a step in the lesson.
Step 1 Passing comes before the first discard
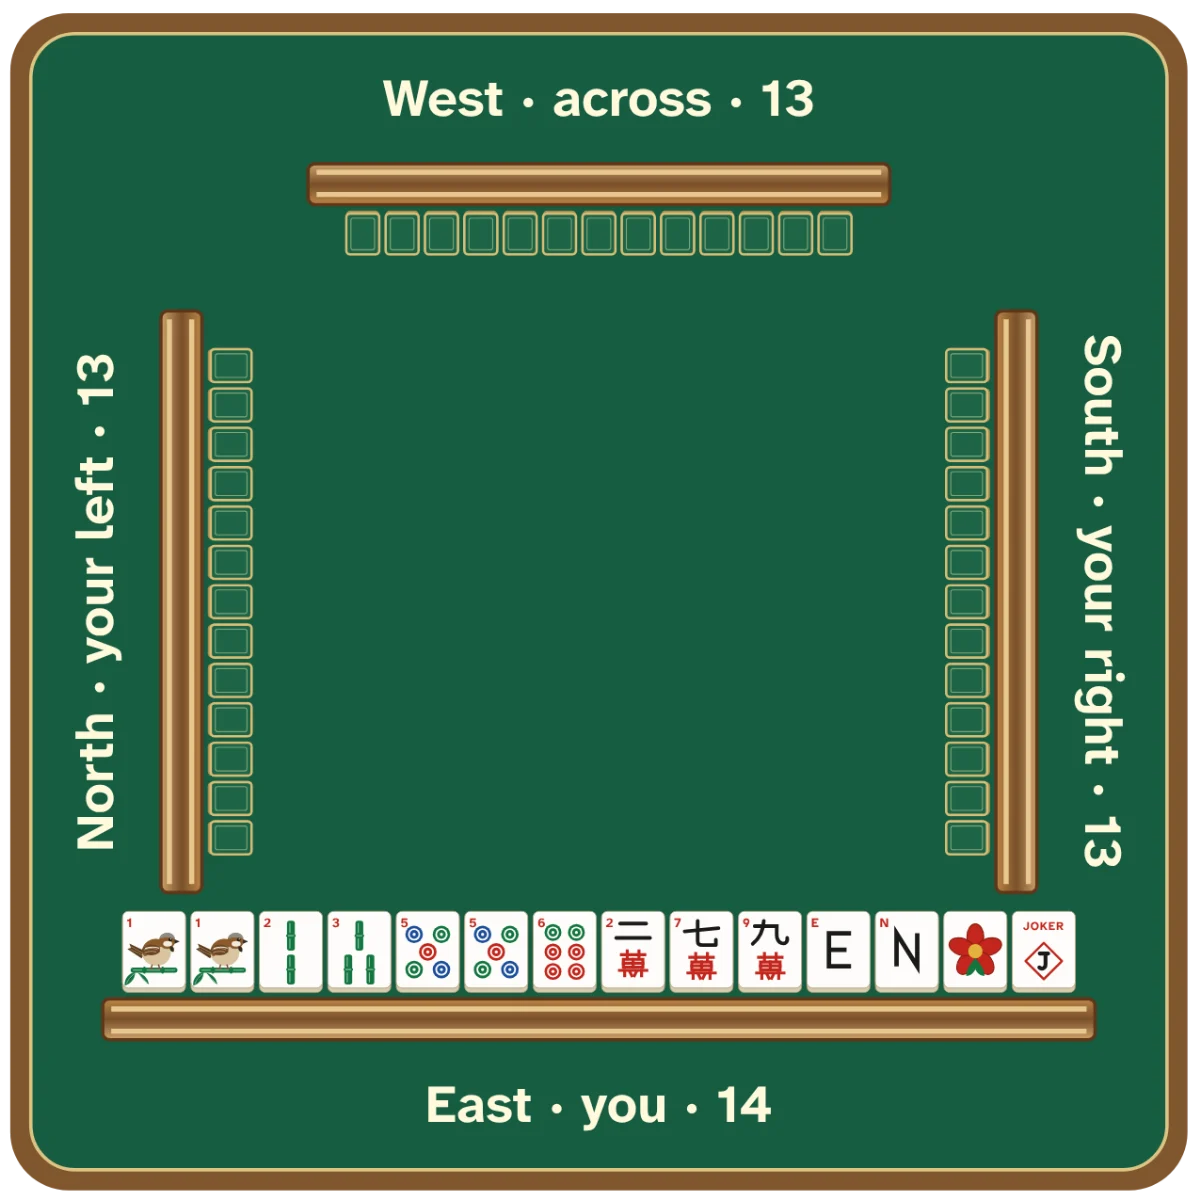
The deal is done and your tiles stand on your rack. Next comes the Charleston: a series of passes in which you trade tiles with the other players. This chapter teaches the passing rules; Chapter 6 shows how to choose which tiles to pass.
1 · The deal
East has 14 tiles, the others 13. The walls are still on the table.2 · The Charleston
Everyone passes 3 tiles at a time: right, across, left, then maybe 3 more.3 · The courtesy pass
If both agree, one last pass of up to 3 tiles with the player across.4 · Play begins
East makes the first discard. No one has discarded until now.
The Charleston comes after the deal and before anyone discards.
On each pass, you give away tiles you don’t need and get others that may suit your hand better.
Pass 3, get 3 back
1. Pick 3 tiles you don’t need
Here: 2 Crak, 9 Crak and North.
2. Pass them face-down. Leave the 3 new ones face-down until yours have gone.
Your 3
to your
right
From your
left
3 new, still
face-down
For a moment you hold 11 tiles:
3. Pick up the 3 new tiles
14 − 3 + 3 = 14 tiles
What you’ll practice
- Pass in the order Right → Across → Left.
- Pick a legal 3-tile pass and keep the correct number of tiles in your hand.
- Decide on a second Charleston and on the courtesy pass (an optional last pass with the player across; step 10).
- Make a blind pass without seeing the tiles.
In the examples, you sit in East’s seat: you have 14 tiles and the other 3 players have 13. No one has discarded yet.
This browser saves your answers and your place on this device, so you can leave and come back.
Step 2 Three passes, then a choice
On every normal pass (the blind pass and the courtesy pass come later), you send 3 tiles face-down and receive 3. The first Charleston is made up of 3 passes:
Pass 1
First Right
Pass 2
First Across
Pass 3
First Left
Then comes a choice. Every player must agree to a second Charleston. If everyone agrees, the order is reversed:
Pass 4
Second Left
Pass 5
Second Across
Pass 6
Last Right
Players call them First Right, First Across and First Left, then Second Left, Second Across and Last Right. Some guides call the last one the Second Right.
There are 3 required passes, then 3 optional passes. If the table starts them, all 3 are made. The courtesy pass comes after them and is separate.
“Right” and “left” are your own right and left as you sit at the table. You must play the first Charleston unless East already holds a winning hand before any passing starts. We’ll come to that rare case near the end.
Step 3 Watch where your tiles go
Use the buttons to step through the 6 passes. You sit at the bottom as East. All 4 players pass on every pass, each in the same direction from their own seat.
First Charleston · Pass 1: First Right
All 4 players pass 3 face-down tiles to their own right. Your 3 go to South, on your right, and your new 3 come from North, on your left. Send your 3 before you pick up the new ones.
The walls aren’t shown.
- Your 3 tiles going out
- The 3 tiles coming to you
- The other players’ passes
On a Right pass, you send tiles to your right, but your new tiles arrive from your left. Every player passes the same way from their own seat.
Step 4 Quick question: the first pass
Pick one answer. Read the explanation before you move on.
The deal is over. Where does your first 3-tile pass go?
Step 5 Pass 3, receive 3
Pick 3 tiles from your hand. Lay them face-down in a row and pass them to the correct player. Send your own pass before you pick up the tiles passed to you.
All 4 players pass on every Charleston pass. East doesn’t go first. For now, make normal passes; blind passing comes later.
Pass 1: First Right
Pick 3 tiles that aren’t Jokers, then pass them to your right. This exercise checks the passing rules; there’s no card line you need to aim for.
Jokers can never be passed (step 6 explains).
Your 14 tiles · shown in rows to fit the screen
To take a tile out of the pass, select it again.
Pass these tiles to…
Step 6 Keep all your Jokers while passing
Jokers cannot be passed. This holds for both Charlestons and for the courtesy pass. It’s a rule, not only a strategy tip.
Stays in your hand
A Joker is never passed.
May be passed
Any tile except a Joker: numbered tiles, Winds, Dragons and Flowers.
Whether you want to pass a certain tile depends on which patterns on the card you’re considering.
A tile you received can be passed again
Imagine someone passes you a 7 Dot. If it doesn’t help the patterns you have in mind, you may put it in your next normal pass.
Pass 1: a 7 Dot comes in
Pass 2: you pick it, with 2 others
They go face-down, across
You don’t have to keep a tile only because someone passed it to you a moment ago.
Before you send a pass: count your tiles (3 on every Charleston pass), look for Jokers, then turn the tiles face-down.
Count 3
No Joker
It stays
Face-down
Step 7 Different tiles, same count
After each pass, East still has 14 tiles and everyone else still has 13. Because you send and receive the same number, those totals don’t change.
You send 3 and get 3, so no one’s count changes. Count your tiles after each pass.
If any count is wrong, speak up before more tiles move. Don’t quietly discard an extra tile or take one from the wall.
A wrong count usually means a new deal
During the Charleston, a wrong count usually means a misdeal: the deal doesn’t count.
Put the tiles back, mix them, build new walls and deal again.
A misdeal: all the tiles go back to the middle, face-down. They are mixed, the walls are built again and the tiles are dealt again.
No hand is declared dead during the Charleston, because play hasn’t started yet. (A dead hand is one that can no longer win because of a rule mistake; Chapter 10, Section 2 explains it.)
The one exception: North has 12
North, on East’s left, takes the last tile of the deal. If North forgot it and has only 12 tiles, North may take the next tile from the wall before East’s first discard. No one else may fix a count this way.
1 · North counts 12 tiles
2 · North takes the next tile: 13
A close-up of North’s rack, on your left. The outlined tile is the next one in the wall, where the deal stopped.
Fix it, or deal again?
At each table, one player has the wrong count. Decide what happens.
Table 1
Right after the deal, North counts 12 tiles. North forgot to take the last tile of the deal.
Table 2
After the First Right, South counts 12 tiles.
Step 8 Every player’s choice matters
When the first Charleston is done, pause before the Second Left. Ask the table, “Second Charleston?” Any one player can say no and doesn’t need to give a reason.
Three players say yes and North says no. One no is enough, and North doesn’t need a reason. Next comes the courtesy pass, if anyone wants one.
If anyone says no before anyone looks at the Second Left tiles, the table skips the whole second Charleston. It goes on to the courtesy pass, which is optional.
Once anyone looks at the Second Left tiles, all 3 passes of the second Charleston must be finished.
Still time
The Second Left tiles are set down, face-down. No one has looked at them yet, so anyone may still say no.
Too late
Someone has looked at their Second Left tiles. Now the Second Left, Second Across and Last Right must all be finished.
Decide as a table
You want a second Charleston, and so do 2 other players. West says, “I’d like to stop.” What should the table do?
Say what you want during the pause between the Charlestons, so your choice is clear before anyone looks at the Second Left tiles.
Step 9 Left, across, then right
If the table goes on, make these 3 passes:
Pass 4
Second Left
Pass 5
Second Across
Pass 6
Last Right
Pass 4, the Second Left: every player passes 3 face-down tiles to their own left. Yours go to North, and South’s come to you.
- Your 3 tiles going out
- The 3 tiles coming to you
- The other players’ passes
For the Second Left, some tables set the 3 face-down tiles in a small pyramid, with 2 on the bottom and 1 on top. This shape is a reminder that sets it apart from the First Left. It’s a table custom, not a different number of tiles.
Second Left: 3 face-down tiles in a pyramid, 2 below and 1 on top
Here is your hand after the first Charleston. This time, everyone has agreed to the second Charleston. Pick 3 non-Joker tiles for each pass.
Pass 4: Second Left
Pick 3 tiles that aren’t Jokers, then pass them to your left. This exercise checks the passing rules; there’s no card line you need to aim for.
Your 14 tiles · shown in rows to fit the screen
To take a tile out of the pass, select it again.
Pass these tiles to…
Step 10 Agreeing on a courtesy pass
After the Charleston ends, you may make one last pass with the player across from you. This is called the courtesy pass. You can make it even if someone stopped the second Charleston.
You may also hear it called the Optional Pass.
You offer 3 and West offers 1, so you each pass 1. South offers 2 and North offers 0, so they make no courtesy pass. Each pair across decides for itself.
- Your tile going out
- The tile coming to you
- Ask how many.
You each offer 0, 1, 2 or 3 tiles. - Use the smaller number.
You both send and receive that many tiles. If either of you offers 0, neither of you passes. - Pass face-down, with no Jokers.
No Joker may go, even on the courtesy pass. Turn your tiles face-down before you pass them. - Each pair decides for itself.
The other 2 players agree on their own number.
Try other offers
You offer
Across offers
How many tiles will each of you pass?
You can politely decline: “No courtesy for me, thank you.” Choosing 0 is legal.
Step 11 Quick question: passing Jokers
Pick one answer. Read the explanation before you move on.
In the courtesy pass, you and the player across agree to pass 1 tile each. Can that tile be a Joker?
Step 12 Don’t look at the blind tiles
Pass 1
First Right
Normal only
Pass 2
First Across
Normal only
Pass 3
First Left
Blind allowed
Pass 4
Second Left
Normal only
Pass 5
Second Across
Normal only
Pass 6
Last Right
Blind allowed
With a blind pass, you send 1, 2 or 3 incoming tiles onward without looking at them. If needed, add your own non-Joker tiles to make 3 in all.
It is allowed only on the First Left (pass 3) and the Last Right (pass 6), and it is optional. You can’t use it on any other pass. On the courtesy pass you don’t need it: you can pass fewer tiles, or none.
On a blind pass, you wait for the incoming tiles first. On the First Left, wait for the 3 tiles from your right. Keep them face-down, then send 3 to your left.
Why use it? If you want to give up fewer than 3 of your own tiles, it lets you keep more of your own hand. The downside: an unseen tile you send onward might have helped you.
Worked example: the First Left
Three tiles arrive face-down from your right. You pass to your left. Pick how many of your own tiles to include.
Tiles from your own hand
1. 3 tiles arrive face-down from South, on your right
from
South
Don’t turn them over.
2. Send 2 of them on to North, still unseen, with 1 of your own
Your own
to
North
Dashed: the 2 unseen tiles. Gold: your own 1, turned face-down.
1 of your own + 2 unseen = 3 tiles
3. Only now, look at the tile you kept
Still face-down until your pass has gone.
14 − 1 + 1 = 14 tiles
Keep the incoming tiles face-down until you’ve sent the blind ones onward. If you look first, you can no longer pass those tiles blind.
What if several players want to pass blind?
Then they may all be waiting for tiles to arrive. The way out is an IOU, short for “I owe you.” The player with the most of their own tiles to pass goes first. That player passes those tiles and says “I owe you” for the rest.
Now the next player has tiles to pass on, and makes their pass. The others follow in turn. When the last pass reaches the first player, that player pays what they owe from those tiles, still unseen. In the end, everyone has passed 3.
You have the most of your own tiles to pass, 2, so you start: 2 tiles to North and “I owe you 1.” North, West and South then pass in turn. When South’s 3 tiles reach you, you pass 1 of them on to North, unseen.
If several players have the same number to pass, one of them starts.
In the next step, you make 2 blind passes yourself: on the First Left and on the Last Right.
Step 13 Pass tiles on without looking
Now make 2 blind passes yourself: on the First Left, then on the Last Right. You decide how many of the incoming tiles to pass on unseen, and which of your own tiles make up the rest.
Pass 3 tiles in all. Keep the incoming tiles face-down until your pass has gone.
Each round uses its own example hand.
Round 1 of 2 · Pass 3: First Left
3 tiles arrive face-down from South, on your right. Your pass goes to North, on your left.
The 3 tiles passed to you
Tap each tile you’ll pass on unseen. Tap it again to keep it.
Your 14 tiles · shown in rows to fit the screen
To take a tile out of the pass, select it again.
Your pass to North
Step 14 A rare win before the first discard
At this point, East is the only player with 14 tiles, so only East can already have a complete winning hand.
Before passing starts
If the tiles dealt to East already match a line on the agreed card, East declares Mah Jongg right away.
The game is over. There is no Charleston. People often call this a Heavenly Hand.
Consecutive Run · a teaching row, not a line from an NMJL card
FF
222
33
4444
555
(Any 1 Suit · Any 4 Consec. Nos.)
East’s 14 dealt tiles match the whole line.
Rare case: a pass completes East’s hand during the Charleston
Sometimes a pass completes East’s winning hand partway through a Charleston. East can keep the hand only if no normal pass is still to come in that Charleston. On a normal pass, East must give away 3 of the 14 tiles, and only that Charleston’s last pass may be blind.
Complete after the First Right: it breaks up
- Pass 1 · First Right
East’s hand is complete. - Pass 2 · First Across
A normal pass: East must give away 3 of the 14 tiles.
Any 3 tiles East passes break up the hand.
Complete after the First Across: East keeps it
- Pass 1 · First Right
A normal pass. - Pass 2 · First Across
East’s hand is complete. - Pass 3 · First Left
Blind: East passes all 3 incoming tiles on unseen.
East keeps all 14 tiles.
When East can keep the hand, East goes on in this order:
Finish the round.
If that Charleston’s last pass is still to come, East makes it blind: East passes all 3 incoming tiles on unseen. East’s 14 tiles stay as they are.For example, on the First Left:
On to your left,
unseenIn from
your rightStop before a second Charleston.
If this was the first Charleston, East stops the Charleston there. Any player may stop it.East: “No second Charleston.”
Turn down the courtesy pass.
East passes no tiles across.East: “No courtesy, thank you.”
- Declare Mah Jongg.
East shows all 14 tiles, and the table checks them against one line of the agreed card.
When it works, people often call this an Earthly Hand. That is an informal name, not a League term. Groups may handle this rare case in different ways, so agree on it with your group.
Groups that look close are not enough. All 14 tiles must match one whole card line and its requirements. Chapter 3 showed you how to check those.
Step 15 Do the passes on your own
Start as East with a new 14-tile hand. Pick legal tiles, choose the direction and make the first Charleston. Then decide on the second Charleston and the courtesy pass.
You can check the passing reference if you need to. This practice uses normal passes; you practiced blind passes in step 13.
Pass 1 of the first Charleston
Choose which tiles to pass and where to send them. This exercise checks the passing rules; there’s no card line you need to aim for.
Your 14 tiles · shown in rows to fit the screen
To take a tile out of the pass, select it again.
Pass these tiles to…
See the passing reference
Pass 1
First Right
Pass 2
First Across
Pass 3
First Left
Then decide whether to go on.
Pass 4
Second Left
Pass 5
Second Across
Pass 6
Last Right
Courtesy pass: with the player across, 0 to 3 tiles. You each pass the smaller offer.
Step 16 See what you’ve learned
Answer 10 questions about passing. Your first answer to each question is what counts in this round. You’ll see an explanation after each answer.
Try to get at least 8 out of 10 right. Use your results to decide what to practice again; they don’t certify your skill at a real table.
Afterward, review the questions you missed or take the whole quiz again. There’s no time limit.
Step 17 Keep this passing reference close by
The whole Charleston at a glance
The deal
East has 14 tiles; the others have 13.
First Charleston · required
Pass 1
First Right
Pass 2
First Across
Pass 3
First Left
Pause
Any one player may stop the second Charleston, before anyone looks at the Second Left tiles.
Second Charleston · only if everyone agrees
Pass 4
Second Left
Pass 5
Second Across
Pass 6
Last Right
Courtesy pass
Optional: with the player across, 0 to 3 tiles. You each pass the smaller offer.
You offer 3
Across offers 1
Each passes 1
Play begins
East makes the first discard, unless the passing has given East Mah Jongg.
Each Charleston pass
3 tiles, face-down
No Jokers
A Joker stays in your hand on every pass, the courtesy pass too.
Blind: First Left or Last Right
Pass 1 to 3 incoming tiles on unseen (dashed), plus your own (gold) to make 3.
East puts 1 tile face-up in the middle. That first discard starts normal play. East is left with 13 tiles, like everyone else.
Practice with real tiles
3 incoming tiles,
face-down
Set out your 14 tiles, and 3 face-down tiles as if they had just been passed to you.
Lay out a hand plus 3 face-down incoming tiles. Say the first 3 directions out loud. Show a normal pass, then explain what makes a blind pass different. Last, explain what happens if you offer 3 courtesy tiles and the player across offers 0.
Check your explanation
Right, across, left. In a normal pass, you send 3 of your own non-Joker tiles face-down before you pick up the tiles passed to you.
In a blind pass, you send 1 to 3 incoming tiles onward unseen, and only on the First Left or the Last Right. A courtesy offer of 0 means that pair makes no courtesy pass.
Chapter 6: Choosing a Hand comes next. It shows how to pick target hands from your tiles, then how to use them to choose your passes. Use Next to go on, or use Back and Chapter contents to look at an explanation again.
Practicing on screen helps you rehearse the decisions. Handling real tiles and keeping up with a real table still take practice.